 English
 русский
 Español
 عربى
عربى 中文简体
中文简体
 >
>The core highlight of this filter is its built-in silicone sheet filter layer. As a high-performance elastic material, silicone has high-temperature resistance, aging resistance, corrosion resistance,...
See Details [email protected]
 +86-18368206374
 No.99,Yuma Road,Mazhu Town,Yuyao City,Zhejiang Province,China.
How to Install and Maintain a Home Water Filter: A Step-by-Step Tutorial
Industry News-1. Installing a Household Water Filter:
1. Preparation Work
Before you begin the installation, you’ll need to gather some tools and accessories to ensure the process runs smoothly:
- Tools: Screwdrivers, wrenches, pipe pliers, sealing tape, etc.
- Accessories: The installation kit that comes with the water filter typically includes pipes, connectors, filter cartridges, and sealing rings.
Tip: Before starting the installation, it’s strongly recommended to read the product manual. Different brands and models of water filters may have slightly different installation steps, so understanding the details in advance can help avoid unnecessary issues.
2. Choosing the Installation Location
Choosing the right installation location is key to ensuring your water filter works properly:
- Near the water source: The ideal spot is close to your faucet or water supply pipe. This will make it easier to connect the inlet pipe.
- Space and ventilation: Ensure there is enough space for the filter and good airflow to prevent the machine from overheating or becoming damp.
- Electrical outlet (if needed): If your water filter requires power (for example, UV sterilization lamps or electric pumps), ensure the installation location is near an electrical outlet.
3. Turn Off the Water Supply
Before installation, make sure to turn off the main water valve to prevent any leaks or water flow during the process.
4. Install the Water Pipe Connectors
Now, connect the water pipes to the filter and water supply:
- Inlet connection: Find the inlet port on the filter and attach the inlet pipe securely.
- Outlet connection: Similarly, connect the outlet pipe to the outlet port, ensuring water flows easily through the filter.
- Sealing: Use sealing rings or sealing tape to ensure that all connections are leak-proof.
5. Install the Filter Unit
Once the pipes are connected, it’s time to set up the filter unit itself:
- Fix the unit: Secure the water filter in place using the provided brackets, screws, or wall mounts. Make sure the unit is stable and firmly attached.
- Connect the pipes: Double-check that the inlet and outlet pipes are properly connected to their respective ports on the filter.
6. Inspect and Test
After installation, perform a test to ensure everything is working correctly:
- Check for leaks: Turn the water supply back on and inspect all connections for leaks.
- Test water flow and quality: Turn on the faucet and check that the filtered water flows smoothly and that the water quality meets expectations.
7. Adjust and Test Flow Rate
If your water filter has a flow control feature, adjust the flow rate to your preference. Ensure the water flow is neither too fast nor too slow.
2. Maintaining a Household Water Filter:
1. Regularly Replace the Filter Cartridges
The filter cartridge is the most critical part of your water filter as it removes impurities and harmful substances from the water:
- Frequency: Filter cartridges typically need to be replaced every 6 months to a year, depending on your water quality and usage. If you’re using a reverse osmosis (RO) membrane, you may need to replace it every 2-3 years.
- Reminder: Some advanced filters come with a cartridge replacement reminder feature, which notifies you when it’s time to change the filter.
Common Filter Types and Replacement Cycles:
| Filter Type | Recommended Replacement Cycle | Filtration Function |
|---|---|---|
| Activated Carbon | 6-12 months | Removes chlorine, odor, organic compounds |
| Reverse Osmosis (RO) | 2-3 years | Removes bacteria, viruses, heavy metals |
| Ceramic Filter | 1 year | Removes particles, sediment, impurities |
2. Clean the Filter Unit
Regular cleaning of your water filter helps extend its lifespan and maintain optimal performance:
- External cleaning: Periodically wipe down the filter’s exterior with a damp cloth to remove dust and grime, keeping the unit looking clean.
- Internal cleaning: Some filters may need internal cleaning. You can use a specialized cleaner or mix equal parts of vinegar and water to clean the water tank and pipes. Cleaning should be done every 3-6 months.
3. Check the Pipes and Connections
Inspect all the pipes and connectors regularly to prevent leaks or looseness:
- Pipe inspection: If you notice any cracks or wear in the pipes, replace them immediately.
- Connector inspection: Ensure the seals and connectors are intact and tight to prevent any leaks.
4. Maintain the Water Quality Sensors
If your water filter includes a water quality sensor, check it regularly to ensure proper functioning:
- Regular calibration: Some water quality sensors need to be calibrated periodically to ensure they provide accurate readings.
- Clean the sensor: Wipe the sensor clean to remove any dust or contaminants that may affect its performance.
5. Drain the Pipes
If you plan to leave your water filter unused for an extended period (e.g., during a vacation), it’s best to drain the water pipes to avoid any potential water quality issues.
6. Watch for Changes in Water Quality
If you notice changes in the taste, clarity, or flow rate of the filtered water, it could indicate that the filter needs cleaning or the cartridge needs replacing. Regularly check the water quality to ensure consistent filtration performance.
7. Regularly Check for Leaks
Check for any signs of leaks around the filter and connectors. A simple way to do this is by wiping down the connection points with a tissue or paper towel and looking for water marks. If you notice leaks, repair or replace the damaged parts promptly.
3. Common Problems and Solutions
1. Slow Water Flow
Slow water flow is often due to a clogged filter or obstructed water pipes:
- Possible causes: The filter cartridge has been in use for too long or the pipes have debris blocking the flow.
- Solution: Clean or replace the filter cartridge, and check the pipes for blockages.
2. Cloudy or Discolored Water
Cloudy water could be a sign that the filtration is no longer effective or that the filter has aged:
- Possible causes: Expired filter cartridge or damaged filtration membrane.
- Solution: Replace the filter cartridge in time, and check whether the membrane needs to be replaced.
3. Leaking
Leaks are often caused by loose connectors or worn-out seals:
- Possible causes: Improperly tightened connections or old sealing rings.
- Solution: Reinstall or tighten the connectors, or replace worn-out seals.
Related products
-
 >
>
RH-06J5BSingle Water Filter with copper recoil valve is characterized by its efficient filtration system, which can effectively remove impurities, suspended matter, residual chlorine, odor and some ha...
See Details -
 >
>
1. Single Water Filter(15BAR).2. 10" PET bottle+black cap, 3/4"brass thread.3. With 10" PP 70g filter cartridge.4. Color box packing.5. Components: wrench+plastic hanging board+screw.
See Details -
 >
>
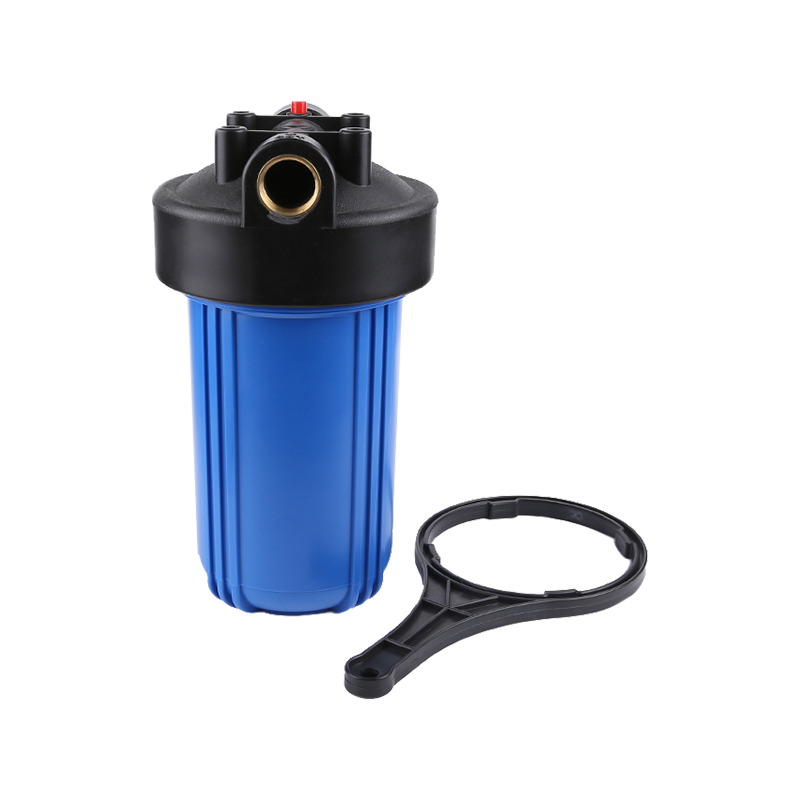
1. Single Water Filter(15BAR); 2. 10" PET bottle+blue cap,3/4"brass thread.3. With 10" PP 70g filtercartridge.4. Color box Packing. 5. Components: wrench+plastic hanging board+screw.
See Details -
 >
>
1. Single Water Filter(15BAR).2. 10" PET bottle+blue cap,3/4"brass thread.3. With 10" pp 70g cartridge. 4. Color box Packing. 5. Components: wrench+plastic hanging board+screw.
See Details -
 >
>
1. Single Water Filter(15BAR).2. 10" PET bottle+blue cap,3/4"brass thread.3. With 10" PP 70g filter cartridge.4. Color box Packing.5. Components: wrench+plastic hanging board+screw.
See Details -
 >
>
1. Single Water Filter(15BAR).2. 10" PET blue bottle+blue cap,3/4"brass thread.3. With 10" pp 70g cartridge. 4. Color box Packing. 5. Components: wrench+plastic hanging board.
See Details -
 >
>
1. Single Water Filter(15BAR).2. 10" PET transparent bottle+white cap,1/4"brass thread.3. With 10" pp 70g cartridge. 4. Color box Packing.
See Details
If you are interested in our products, please consult us
Ningbo Yaorui Water Purification Technology Co., LTD. All Rights Reserved.
Wholesale Household Water Purifier Manufacturers
